
Page 35 - Build 165
P. 35
Step 8: Install fabricated corner ashing over apron ashing and fascia.
Step 9: Install the barge ashing over the roo ng and fascia board.
Step 10: Install cavity closer above apron ashing maintaining the minimum gap required by E2/AS1 (generally 35 mm).
Step 11: Install cavity battens to upper wall.
Step 12: Install cladding over the cavity battens cutting the cladding to t around the apron ashing as required.
Some speci cs from E2/AS1
Speci c requirements in Acceptable Solution E2/AS1 include that there must be:
● a 75 mm minimum wall cladding cover over
the upstand
● a gap between the wall cladding and the
roo ng as given in E2/AS1 Table 7
● roof ashing cover over the roo ng as per
E2/AS1 Table 7, depending on wind zone and roof pitch.
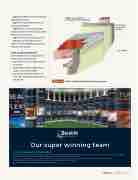
Step 12 – wall cladding cut around apron ashing as required
Figure 5
Step 12 – Roof/wall junction construction sequence.
Our super winning team
OUTSTANDING IN THEIR FIELD
If you’re planning on watching the rugby this season (Feb-August) or going to any of the home games, keep an eye out for Bostik at your favourite stadium. We’ll be there because our smart adhesives are a winning combination – the best in their field.
Bostik is a global brand with a large local footprint. For more than 125 years, tradies and DIYers have relied on Bostik adhesives and sealants. Our super team of winners is always on your side. Now that’s something to shout about!
Visit bostik.co.nz or phone 0508 222 272 for more information.
seal ashing to fascia and cladding
wall cladding
Build 165 — April/May 2018 — 33
