
Page 34 - Build 165
P. 34
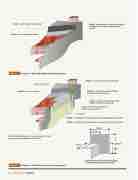
       Step 3 – apron  ashing turned up wall
Step 3 – apron  ashing over roo ng
Step 4 – lap an additional layer of wall underlay or  exible  ashing tape over apron  ashing upstand
        Figure 3 Steps 3–4 – Roof/wall junction construction sequence. upper wall underlay
Step 10 – install cavity closer
Step 11 – install cavity battens to upper wall
Step 8 – install fabricated corner  ashing over apron  ashing and fascia
Step 5 – cavity batten trimmed at closer height to allow wall underlay lap
Step 6 – install internal corner wall  ashing over cavity battens
fascia board
Step 9 – install barge  ashing over roo ng and fold down over fascia board Step 7 – install lower wall cladding over cavity and then install fascia board
                                                                                        32 — April/May 2018 — Build 165
150 mm 75 mm
 Note: All  ashing dimensions (turn-ups and laps) to meet requirements of Acceptable Solution E2/AS1.
75 mm
150 mm 75 mm
fabricated corner  ashing  tted over apron  ashing before barge  ashing installed
 Figure 4
Steps 5–11 – Roof/wall junction construction sequence.
